
 HELOC
HELOC CalHFA
 Construction Loans
 FHA 203k
 Home Equity Loans
 Home Renovation Loans
 PACE Loan
 VA Loan
 FHA Loan
 USDA Loans
 Home Improvement Loans
 Other Loan Types


Renovation loans refer to mortgages that let you finance and renovate a home. You can use them to renovate a home that you already own or a new home. Financing the home and its renovations consolidates the renovation costs into a low-rate mortgage. This is more convenient than taking separate loans to buy a home and perform repairs.
Among these options, RenoFi Loans stand out by allowing you to borrow against your home’s future value after renovations without worrying about refinancing and potentially losing your existing low rate. This allows homeowners to borrow up to 11x more than traditional options making RenoFi a top choice for larger or more extensive projects.
How Do Renovation Loans Work?
Renovation loans allow you to borrow more than the current value of your home. The highest amount that you can borrow is the estimated future value of your home once the renovations are done.
To qualify for a renovation loan, you must provide cost estimates and a detailed construction plan. A home appraiser inspects your property and reviews your plans and quotes to value it as improved.
If the project is viable, you will receive the loan’s mortgage portion immediately. The funds are released in draws whenever your project reaches the set milestones. RenoFi Loans take this a step further by maximizing your borrowing potential and eliminating the need for draws and inspections. This way, you can tackle larger projects with ease, free from the cumbersome and labor-intensive processes that often frustrate both contractors and homeowners.
Renovation Loan Options for Your Home
Mortgage programs categorize renovation loan options into conforming and government-backed loans. A conforming loan meets the criteria set by the Federal Housing Finance Agency and is purchased by government-sponsored enterprises. These loans have guidelines and set limits for loan amounts, property types, down payments, and borrower credit profiles.
Government-backed loans, on the other hand, are guaranteed and issued through a federal agency. Their requirements are less stringent with lower debt-to-income ratios and credit ratings.
1. Home Equity Loan
You can use a home equity loan to finance major home repairs. A HELOC allows you to deduct your loan interest depending on your home improvement project. It is based on installments that are secured by your home. They are often referred to as second mortgages and allow you to borrow against the equity you have built in your home. They have fixed interest rates, and you make monthly payments during the entire repayment period.
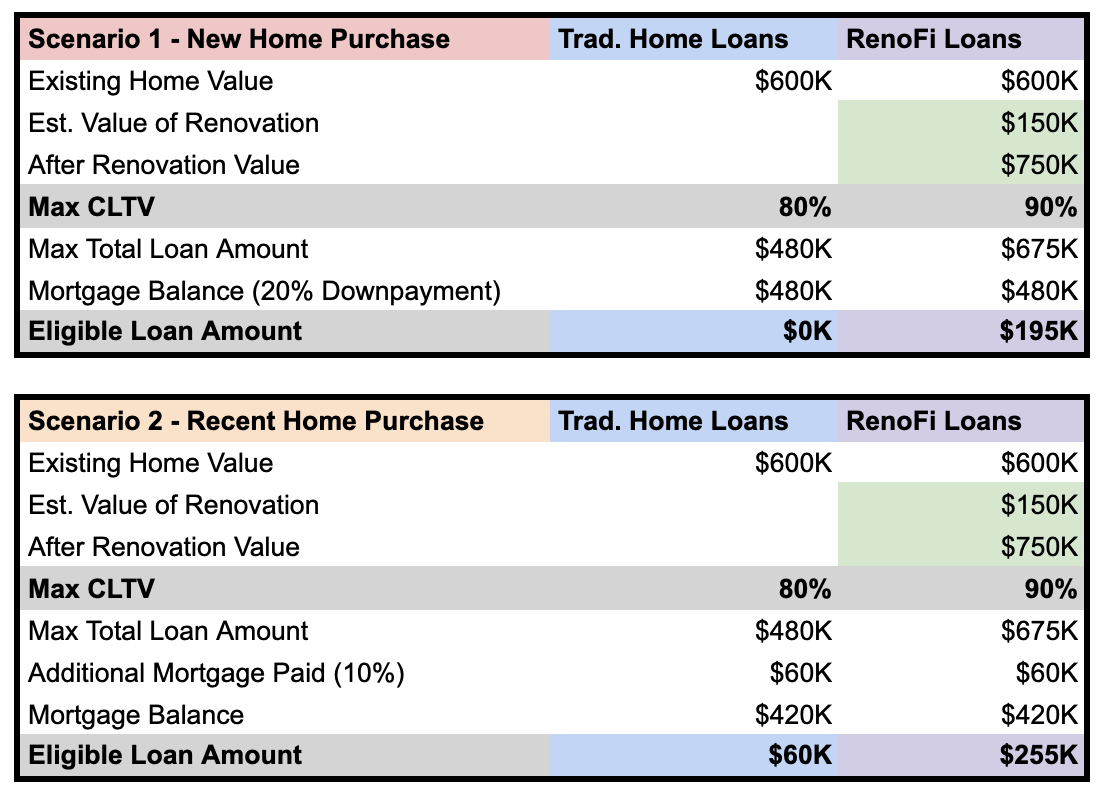
Scenario 1 (New Home Purchase): For example, to make the math simple, let’s say you just purchased a $600,000 home:
- Home price: $600,000
- Downpayment (20%): $120,000
- Current Mortgage Amount: $480,000
You want to spend $150,000 to renovate your new home and increase the value of your home.
Traditional Home Equity Loan Terms:
A traditional Home Equity Loan may offer up to 80% of your home value as a second mortgage in the second lien position (second priority of debt that gets paid out after the 1st), depending on the first mortgage balance.
Home price: $600,000
Current Mortgage Balance: $480,000
Example Home Equity Loan % of Home Price: 80%
Example Home Equity Loan Amount:
- $600,000 * 80% = $480,000 (80% of Total Home Value)
- $480,000 - $480,000 (Current Mortgage Balance) = $0 (Home Equity Loan Amount)
Using a traditional Home Equity Loan, you would be unable to borrow any money to renovate your new home.
Scenario 2 (Recent Home Purchase): Assuming that you have now paid 10% of your mortgage:
Home price: $600,000
Current Mortgage Amount: $420,000
Example Home Equity Loan % of Home Price: 80%
Example Home Equity Loan Amount:
- $600,000 * 80% = $480,000 (80% of Total Home Value)
- $480,000 - $420,000 (Current Mortgage Balance) = $60,000 (Home Equity Loan Amount)
Using a traditional Home Equity Loan, only after you paid 10% of your mortgage ($60,000), you would be able to borrow $60,000 for your renovations. However, you are still short $90,000 from the $150,000 that you want to spend renovating your home.
2. RenoFi Home Equity Loan
Instead of only using the equity you have in your house, RenoFi allows you to use the After Renovation Value (ARV) of your home as a lump sum at a fixed interest rate.
For example, if RenoFi assesses your renovation plan and believes you will increase the value of your home from $600,000 to $750,000, RenoFi loans will allow you to take a loan against the future ARV (After Renovation Value) of your home of $750,000. Let’s walk through an example where you want to spend $150,000 to renovate your new home and increase the value of your home by $150,000:
Scenario 1 (New Home Purchase):
- Home price: $600,000
- Downpayment (20%): $120,000
- Current Mortgage Amount: $480,000
Example Home Equity Loan Amount:
- $600,000 * 80% = $480,000 (80% of Total Home Value)
- $480,000 - $480,000 (Current Mortgage Balance) = $0 (Home Equity Loan Amount)
Example RenoFi Home Equity Loan Amount:
Assuming that your renovation project will add $150,000 to your home value
After Renovation Value of Your Home: $750,000
RenoFi Loan Amount:
- $750,000 * 90% = $675,000 (90% of Total Home Value)
- $675,000 - $480,000 = $195,000 (RenoFi Home Equity Loan Amount)
Using a RenoFi Home Equity Loan you have increased your loan amount from $0 to $195,000. Not only are you now able to borrow the $150,000 you wanted to renovate your home, but you can now borrow up to $195,000 because the RenoFi loan is written against your ARV (After Renovation Value).
Without RenoFi loans, you would not have been able to borrow the $150,000 needed to add the renovations that would increase the value of your home by $150,000. Now, with RenoFi loans, you are now able to get the loan you need to add the renovations you want to your home.
Scenario 2 (Recent Home Purchase): Assuming that you have now paid 10% of your mortgage:
- Home price: $600,000
- Current Mortgage Amount: $420,000
Example Home Equity Loan Amount:
Example Home Equity Loan % of Home Price: 80%
Example Home Equity Loan Amount:
- $600,000 * 80% = $480,000 (80% of Total Home Value)
- $480,000 - $420,000 (Current Mortgage Balance) = $60,000 (Home Equity Loan Amount)
Example RenoFi Home Equity Loan Amount:
Assuming that your renovation project will add $150,000 to your home value
After Renovation Value of Your Home: $750,000
RenoFi Loan Amount:
- $750,000 * 90% = $675,000 (90% of Total Home Value)
- $675,000 - $420,000 = $255,000 (RenoFi Home Equity Loan Amount)
Using a RenoFi Home Equity Loan you have increased your loan amount from $60,000 to $255,000 (4.25x more). Not only are you now able to borrow the $150,000 you wanted to renovate your home, but you can now borrow up to $255,000 because the RenoFi loan is written against your ARV (After Renovation Value).
Here’s a summary of the difference between traditional and RenoFi home loans in table form:
In addition to letting you borrow more money for your home renovations, RenoFi loans also offer:
- No draw periods
- No inspections
- No need to give up your original loan
- Higher borrowing limits
RenoFi loans are funded on the day the loan is closed and that is it. Take out the $195k and you get $195k in your bank and you have 20 years to pay off in equal monthly payments with interest and principal, just like a standard mortgage.
3. Traditional Home Equity Line of Credit (HELOC)
Just like a credit card, you can borrow money with a HELOC up to a pre-approved limit, but the equity in your home backs it. HELOCs have variable interest rates and let you draw funds as needed, making them ideal for long-term or ongoing renovation projects.
Scenario 1 (New Home Purchase): Using the same scenario from above:
- Home price: $600,000
- Downpayment (20%): $120,000
- Current Mortgage Amount: $480,000
- Renovation Loan Amount Needed: $150,000
Traditional Home Equity Line of Credit Terms:
A traditional Home Equity Line of Credit may offer 80% of your home value:
Home price: $600,000
Current Mortgage Balance: $480,000
Example Home Equity Line of Credit % of Home Price: 80%
Example Home Equity Line of Credit Amount:
- $600,000 * 80% = $480,000 (80% of Total Home Value)
- $480,000 - $480,000 (Current Mortgage Balance) = $0 (Home Equity Line of Credit Amount)
Using a traditional Home Equity Line of Credit, you would be unable to borrow any money to renovate your new home.
Scenario 2 (Recent Home Purchase): Assuming that you have now paid 10% of your mortgage:
Home price: $600,000
Current Mortgage Amount: $420,000
Example Home Equity Line of Credit % of Home Price: 80%
Example Home Equity Line of Credit Amount:
- $600,000 * 80% = $480,000 (80% of Total Home Value)
- $480,000 - $420,000 (Current Mortgage Balance) = $60,000 (Home Equity Loan Amount)
Using a traditional Home Equity Line of Credit, only after you paid 10% of your mortgage ($60,000), you would be able to borrow $60,000 for your renovations. However, you are still short $90,000 from the $150,000 that you want to spend renovating your home.
4. RenoFi Home Equity Line of Credit (RenoFi HELOC)
Unlike traditional loans, RenoFi HELOCs allow you to use your home’s After Renovation Value (ARV), which can 11x your borrowing power.
Scenario 1 (New Home Purchase): Using the same example above of borrowing $150,000 for renovations to increase the value of your home by $150,000:
- Home price: $600,000
- Downpayment (20%): $120,000
- Current Mortgage Amount: $480,000
Example Home Equity Line of Credit Amount:
- $600,000 * 80% = $480,000 (80% of Total Home Value)
- $480,000 - $480,000 (Current Mortgage Balance) = $0 (Home Equity Line of Credit Amount)
Example RenoFi Home Equity Line of Credit Amount:
Assuming that your renovation project will add $150,000 to your home value
After Renovation Value of Your Home: $750,000
RenoFi Loan Amount:
- $750,000 * 90% = $675,000 (90% of Total Home Value)
- $675,000 - $480,000 = $195,000 (RenoFi Home Equity Line of Credit Amount)
Using a RenoFi Home Equity Line of Credit you have increased your loan amount from $0 to $195,000. Not only are you now able to borrow the $150,000 you wanted to renovate your home, but you can now borrow up to $195,000 because the RenoFi loan is written against your ARV (After Renovation Value).
RenoFi HELOCs provide a line of credit secured by your current home.
- Example RenoFi HELOC Terms:
Years to use credit line: 10 Years
- Interest Only Period: 10 Years
Credit Amount: $195,000
Repayment Term: 15 years
In this example, you’ll have 10 years to use your credit of $195,000. Within those 10 years, just like a credit card, if you borrow against the credit line and pay it back, you will not pay interest.
However, for anything borrowed against your credit, that you do not pay off immediately, you will only pay interest during the first 10 years and then interest and principal after year 10.
Scenario 2 (Recent Home Purchase): Assuming that you have now paid 10% of your mortgage:
- Home price: $600,000
- Current Mortgage Amount: $420,000
Example Home Equity Line of Credit Amount:
Example Home Equity Line of Credit % of Home Price: 80%
Example Home Equity Line of Credit Amount:
- $600,000 * 80% = $480,000 (80% of Total Home Value)
- $480,000 - $420,000 (Current Mortgage Balance) = $60,000 (Home Equity Line of Credit Amount)
Example RenoFi Home Equity Line of Credit Amount:
Assuming that your renovation project will add $150,000 to your home value
After Renovation Value of Your Home: $750,000
RenoFi Loan Amount:
- $750,000 * 90% = $675,000 (90% of Total Home Value)
- $675,000 - $420,000 = $255,000 (RenoFi Home Equity Line of Credit Amount)
Using a RenoFi Home Equity Line of Credit you have increased your loan amount from $60,000 to $255,000 (4.25x more). Not only are you now able to borrow the $150,000 you wanted to renovate your home, but you can now borrow up to $255,000 because the RenoFi loan is written against your ARV (After Renovation Value).
In addition to letting you borrow more money for your home renovations, RenoFi loans also offer:
- No draw periods
- No inspections
- No need to give up your original loan
- Higher borrowing limits
5. Cash-Out Refinance
If you already own a home, a cash-out refinance offers a cheaper way to borrow from your equity. Cash-out refinance provides a new mortgage to replace your existing home loan. The new loan balance is larger than the older one, and you receive the difference as your cash-back. The amount of cash accessible to you depends on the value of your home compared to what you owe.
You must meet lender requirements to get cash-out refinancing. Your debt-to-income ratio must be 45% or less. If it exceeds 45%, you need bank reserves of at least six months. A higher credit score gets you a better interest rate. You also must have paid off a minimum of 20% of the home’s current appraised value.
With a conventional loan, you qualify for cash-out refinance if you have owned the house for a minimum of six months. You can be exempted if your property was legally awarded to you or if you inherited it. A cash-out refinance can cater to major expenses, and you can use it to pay off high-interest credit cards. This builds your credit score since it reduces your credit utilization ratio.
Scenario 1 (New Home Purchase): Using the same example from above
- Home price: $600,000
- Downpayment (20%): $120,000
- Current Mortgage Amount: $480,000
Example Cash Out Refinance Amount:
- $600,000 * 80% = $480,000 (80% of Total Home Value)
- $480,000 - $480,000 (Current Mortgage Balance) = $0 (Cash Out Refinance Amount)
Similar to the situation with Home Equity Loans and HELOCs, with a traditional Cash Out Refinance on a new property, you would be unable to withdraw any money for renovations.
Scenario 2 (Recent Home Purchase): Assuming that you have now paid 10% of your mortgage:
- Home price: $600,000
- Current Mortgage Amount: $420,000
Example Cash Out Refinance Amount:
Example Cash Out Refinance % of Home Price: 80%
Example Cash Out Refinance Amount:
- $600,000 * 80% = $480,000 (80% of Total Home Value)
- $480,000 - $420,000 (Current Mortgage Balance) = $60,000 (Cash Out Refinance Amount)
Again, since you are only able to withdraw $60,000 using a traditional cash out refinance, you are still unable to get the $150,000 you wanted for your home renovations.
6. RenoFi Cash-Out Refinance
Similar to other RenoFi products, with a RenoFi Cash Out Refinance, you can receive a larger amount of cash based on the After Renovation Value (ARV) of your home.
Scenario 1 (New Home Purchase): Using the same example above
- Home price: $600,000
- Downpayment (20%): $120,000
- Current Mortgage Amount: $480,000
Example Cash Out Refinance Amount:
- $600,000 * 80% = $480,000 (80% of Total Home Value)
- $480,000 - $480,000 (Current Mortgage Balance) = $0 (Cash Out Refinance Amount)
Example RenoFi Cash Out Refinance Amount:
Assuming that your renovation project will add $150,000 to your home value
After Renovation Value of Your Home: $750,000
RenoFi Loan Amount:
- $750,000 * 90% = $675,000 (90% of Total Home Value)
- $675,000 - $480,000 = $195,000 (RenoFi Cash Out Refinance Amount)
By writing a loan against your equity in the after-renovation value of your home, RenoFi allows you to borrow funds for renovation against $750,000 versus $600,000. This increases your loan amount from $0 to $195,000, allowing you to borrow infinitely more than a traditional Cash Out Refinance for renovations.
This allows you to receive the $150,000 you were looking for with house renovations and even offer $45,000 above what you were asking for in case you needed more money for renovations.
Scenario 2 (Recent Home Purchase): Assuming that you have now paid 10% of your mortgage:
- Home price: $600,000
- Current Mortgage Amount: $420,000
Example Cash Out Refinance Amount:
Example Home Equity Loan % of Home Price: 80%
Example Home Equity Loan Amount:
- $600,000 * 80% = $480,000 (80% of Total Home Value)
- $480,000 - $420,000 (Current Mortgage Balance) = $60,000 (Cash Out Refinance Amount)
Example RenoFi Cash Out Refinance Amount:
Assuming that your renovation project will add $150,000 to your home value
After Renovation Value of Your Home: $750,000
RenoFi Loan Amount:
- $750,000 * 90% = $675,000 (90% of Total Home Value)
- $675,000 - $420,000 = $255,000 (RenoFi Cash Out Refinance Amount)
Using a RenoFi Cash Out Refinance, you have increased your loan amount from $60,000 to $255,000 because the RenoFi loan is written against the assessed after renovation value (ARV) of $750,000.
Again in this scenario, using RenoFi you are able to borrow significantly more than traditional loan options and borrow the $150,000 you are looking for to make your renovations and even have the option to receive $105,000 on top of the $150,000.
In addition to letting you borrow more money for your home renovations, RenoFi loans also offer:
- No draw periods
- No inspections
- No need to give up your original loan
- Higher borrowing limits
7. Fannie Mae Homestyle Renovation
The Fannie Mae home loan allows you to refinance or buy a home and combine the renovation expenses and closing costs. These loans are cheaper than personal loans or credit cards.
A homestyle mortgage combines the features of a construction loan and a 30-year mortgage. You pay for work as it is completed. You can also borrow more than what is allowed by cash-out refinance since the limit is the value of your home after completing the improvements.
Some of the projects that you can finance using the Home Style loan include:
- Constructing a swimming pool
- Enclosing your garage
- Purchasing and installing kitchen appliances
- Adding water-efficiency devices and solar panels
The loan supports renovations of one- to four-unit homes, planned unit developments, manufactured homes, and condos. The loan limits for a manufactured home are much lower than the rest, and coverage is limited to one unit for investment properties and second home renovations.
Depending on the size of your project, the lender creates a schedule based on finished work that will determine your draws. You can use your contingency reserves if material costs and labor costs exceed your expectations during some phase of the construction.
8. Freddie Mac CHOICERenovation
This loan program was developed to create affordable housing and improve the housing stock in the U.S. You can use the Freddie Mac loan to protect your home from natural disasters by adding retaining walls or retrofitting a foundation.
Borrowers are allowed to combine the Freddie Mac Home Possible loan with Home One and CHOICERenovation program. The Home Possible program allows you to set a 3% down payment and borrow enough funds for your renovations.
As a homeowner, you are tasked with contractor selection, price negotiation, and supervising the work completion. Before the contractor is paid for their work, an inspection must be done after each renovation phase. Your selection of contractors must be licensed and insured. You must also keep track of your project and present copies of the paperwork to your lender.
Important information includes plans, draws on the renovation funds, bids, permits, and change orders. Once the renovations are completed, the appraiser re-inspects the property and compares it with the initial plan.
To qualify for a loan, you must meet Freddie Mac’s conventional loan underwriting guidelines. Repairs and renovations must be at most 75% of the lesser figure between the property’s value after renovation and the renovation costs plus the purchase price.
9. FHA 203k Loan
This is a government-backed mortgage that you can use for house purchases and renovations. It can finance mortgage payments of up to six months as you live in a different location during renovations.
The Federal Housing Administration insures the loan, and borrowers are required to pay FHA mortgage insurance. This coverage protects the lender in case the borrower defaults on payment. FHA 203k loans are of two types: the standard 203k and the limited 203k.
The standard 203k loan is designed for major repairs, with a minimum cost requirement of $5,000. The limited 203k loan is designed for non-structural renovations that do not exceed $75,000.
A 203k loan can have fixed or adjustable rates for 15 or 30-year periods. The amount you can borrow depends on your income and credit rating. Generally, it is the lowest figure of the FHA loan limit at your location, the home’s current value plus renovation costs, or the home’s final value after renovation. You can use the loan for landscaping, repairing septic well systems, and adding units to your property.
10. VA Renovation Loan
A VA loan allows veterans to purchase and repair properties. These mortgages do not require a down payment or mortgage insurance. The loan rolls the home’s purchase price and expected repair costs into a single loan.
With a VA loan, the valuation of your renovated house must be the lesser of the as-completed value determined by the VA appraiser or the total cost of acquisition. The VA home improvement loan offers other options including the VA energy efficient mortgage, VA Cash-out refinance, and specially adapted housing grants.
You can use the VA energy-efficient mortgage to make eco-conscious updates to your property. These loans finance the installation of programmable thermostats, solar water heaters, and weatherizing the home.
A VA cash-out refinance allows you to tap into your home’s equity and use the extra cash to repair and improve your home. If you need home improvements to accommodate a disability, you can benefit from the specially adapted housing grants. If necessary, you can use the loan to improve the caregiver’s home.
11. USDA Renovation Loan
Rural homeowners can get up to 100% financing via the USDA home loan. This is a rehabilitation loan that you can use to purchase and repair or modernize a home. It offers lower interest rates than home equity lines of credit.
In some cases, the interest you pay on your loan is tax deductible. The home’s final improvements may increase its value and resale marketability, but they do not include luxury items. The renovation loans offered by USDA include full and limited options.
Full USDA renovation loans have no minimum or maximum renovation amount, but the Federal Housing Finance Agency sets the loan limits. The loans require a consultant to inspect the property, estimate repair costs, and provide the work write-up. The repairs covered by full USDA loans include bathroom and kitchen modernization, aesthetic appeal changes, and structural alterations.
Limited USDA renovations cover less extensive improvements and repairs, capping $35,000. The loan covers HVAC system repairs and upgrades, minor remodels, painting, and gutter installations. You can only use the loan on a primary home through a purchase loan transaction.
However, if you’re looking for greater flexibility and higher borrowing limits to fund more extensive renovations, RenoFi Loans provide a better solution. With RenoFi, you can tackle larger projects and bring your vision to life with more financial freedom.
Financing Home Renovations Without Equity
Home equity is your interest’s value in your home. Your equity is calculated by subtracting the remaining mortgage balance from your home’s market value. Lenders prefer that borrowers have at least 15% equity before giving them a home equity loan, but it is possible to get a home loan without equity through personal loans. For example, you might qualify for RenoFi’s personal loans of up to $100k with a unique 20-year term.
Banks, online lenders, and credit unions offer personal loans. This type of loan is unsecured and majors on your credit score. The lender uses your credit score to determine the monthly payments, interest rates, and payment terms.
Since the loan does not involve collateral, the interest rate is higher than home equity loans. Before taking a personal loan, you can check your credit score through your credit card provider or bank.
Taking out a personal home improvement loan does not risk losing your home when you fail to make payments. It is generally easier to qualify for a personal loan than HELOC, which depends on your home equity.
Depending on the lender, the funding is available more quickly, even within one day. Since there is no need for a home appraisal, the loan acquisition process is much faster. However, if you don’t have sufficient equity and prefer not to take out a personal loan, RenoFi offers a range of loan products that combine flexibility with high borrowing limits.
Conclusion
If you are planning a home renovation project, RenoFi is the smartest way to finance it. RenoFi focuses on renovations vs remodeling. Renovations cover large projects, for example, transforming your kitchen completely may cost $50,000 and above. Remodeling involves small projects like adding a shower, which might only cost $5,000. Here’s why more people are turning to RenoFi:
- Increased Borrowing Power: Traditional loans often limit you to borrowing up to 80% of your current home value. Alternatively, RenoFi allows you to borrow up to 125% of your home’s current value or 90% of its future value, whichever is lower. This means more money for your renovation project without the need to refinance.
- No Need to Refinance: With RenoFi loans, you can keep your existing mortgage and its low rate intact while accessing funds for your renovation. This is a huge benefit if you’re locked into a favorable rate and don’t want to refinance.
- Streamlined Process: Unlike other loans, RenoFi loans don’t require complicated draw schedules and inspections. This makes it easier to start and complete your project on time.
Choosing the right home renovation loan can make or break your project. While traditional loans like HELOCs, personal, and FHA 203(k) loans have their place, they often come with limitations that can restrict your renovation plans. But RenoFi loans give homeowners a unique and flexible alternative.
By leveraging your home’s after-renovation value, RenoFi allows you to borrow more without the need to refinance your existing mortgage or deal with complex draw schedules and inspections. Therefore, if you are a homeowner looking to maximize your renovation potential, RenoFi loans are the best choice.
Unlike traditional loans, which are based on your current home value or require you to refinance, RenoFi loans are based on the after-renovation value of your home. This allows you to borrow, on average, 11x more, get a low monthly payment, and keep your low rate on your first mortgage.
Explore your RenoFi loan options here.